How to do Gel Nail Polish At-Home
How to NAIL doing your own gel nails at home – your ultimate DIY guide for using Gel Nail polish at home!
Gel nails are perfect for the girl on the go. Got a spare ten minutes? That’s more than enough time to apply Gel nail polish! Whether you’re in a hurry for lunch with the girls, have a job interview in an hour or simply want to binge watch the latest Netflix series (we’re sooo into Dead to Me right now!), then Gel nail polish allows you to achieve a perfect manicure all from the comfort of your own home.
Applying gel nails at home - the essentials
Okay, you’ll need to a little bit of prep the first time, but after that, you’ll be able to skip straight to Step 2.
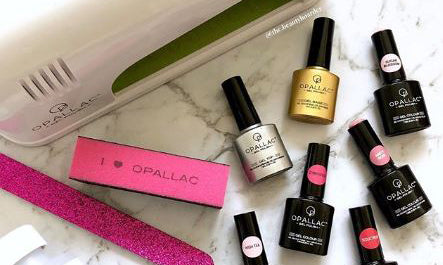
Step 1: Here are the must-have items that you’ll need in order to create perfect gel nails at home.
Opallac nail file
Opallac nail buffer
Opallac 2-in-1 Shine & Soak Solution
Cotton wool ball
Opallac Gel Base Coat
Opallac Gel Colour Coat
Opallac Gel Top Coat
Opallac LED 7 Watt Curing Lamp
You can view the list of products here on the Opallac website, or purchase the starter kit here which includes all of the essentials plus three different colour coats.
Want to know how to do gel nails at home?
If you would prefer to watch a video tutorial instead of reading the instructions, we’ve got you covered! Opallac has prepared a Gel polish step-by-step application video over on YouTube.
Step 2 (the good part!):
Find a comfortable spot close to a power point and plug in the LED light
Just like you would do with regular nail polish, shape and file you nails with a nail file before applying any layers of the lacquer polish
Wash and dry your hands
Lightly buff the nails so there is some fine texture on the surface. Removing the nail’s natural shine and adding this friction will help the Opallac Gel Polish to adhere and last longer.
Wipe away any dust left behind from buffing with a clean tissue. Make sure your nails from here on in don’t touch any substances from this point on. If they do, the lacquer will not apply well.
Apply a thin layer of the gel coat and cure for 90 seconds in the LED light - it’s important to apply clean edges and always seal the nail tip before curing at every step
Apply the first thin layer of your chosen gel and cure for 90 seconds. If any colour does touch the skin around the nail, just wipe it clean before curing
Apply the second thin layer of your chosen gel coat and cure for 90 seconds
Apply a thin layer of the gel coat and cure for 90 seconds – at this point, you’ve finished painting but there will be a sticky residue leftover on the nails
Gently wipe your nails now with a cotton wool ball soaked in the 2-in-1 Shine & Soak solution
The best at home gel nail kit
This truly is the best way to get Gel nail polish at home. Because each of the layers is cured by the LED light, the drying time required between layers is dramatically decreased. Instead of waiting half an hour for the base coat to dry, and then another half an hour for the colour coat and so on, you only have to wait 90 seconds. 90 seconds for the base coat, 90 for each colour coat, and 90 for the top coat. Also, no additional drying time post-mani!
Have you nailed your Opallac Gel polish at home? Show us on Insta and keep us in the loop using #naileditwithopallac


